Showing posts with label Gazelle. Show all posts
Tuesday, February 1, 2011
The 'Lady's Bicycle': Descriptive, Offensive, or Merely Obsolete?
There has been some discussion lately about how appropriate it is to refer to diamond and step-through frame bicycles as men's and ladies' bikes. After all - gender roles are flexible these days, women are no longer expected to wear elaborate skirts, and a low standover height can be convenient for everyone. So why use gender specific terminology? Am I just intentionally being quaint?
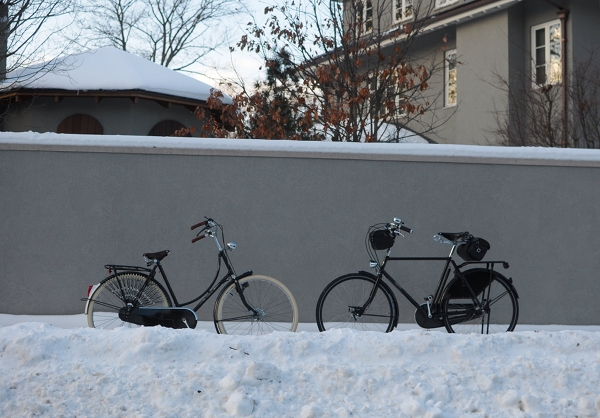
Well, not exactly. You see, when a bicycle model exists in both diamond frame and step-through designs, the latter is usually not just about lowering the standover height. It is also about taking the female anatomy into account. For example, have a look at the pictures below and see whether you notice anything interesting.
These are the Oma and Opa versions of the current production Gazelle Toer Populair bicycles. If you look closely, you will notice that the Oma on the left has a considerably higher headtube than the Opa on the right. This is done in order to set the Oma's handlebars higher, so as to accommodate the typically shorter torsos and arms of female cyclists. The bikes are named "Grandma and Grandpa," because they are, in fact, gender-specific. The expanded headtube tactic is used by many manufacturers on their step-through models, while others use the alternative tactic of shortening the virtual top tube. Either way, more often than not the step-through version of a given bicycle model is designed for the female body. This is not to say that men cannot or should not ride step through frames, but only that step-through frames are typically optimised for female proportions.
Of course, one could ask: Why confound gender-based anatomical differences with preferences for standover height? After all, some women may prefer diamond frames, while some men may prefer step-throughs. That is where statistics and market research come in. Most manufacturers cannot afford to make two versions of diamond frames and two versions of step-through frames within the same model. And statistically, women are considerably more likely to wear skirts and are thus more likely to prefer a step-through transportation bike. Therefore, it makes more sense to optimise the step-through design for the female anatomy, while optimising the diamond frame design for the male anatomy. Naturally, there will be some females who prefer the diamond frame and some males who prefer the step-through. Furthermore, not every woman has a short torso and not every man has a long torso. But when it comes to manufacturing decisions, it's all about tendencies and probabilities - not about individuals.
And speaking of statistics, perhaps we could indulge in another poll (a weekly tradition?). No purpose for this other than my own curiosity, and possibly yours:
In my own vocabulary, I use terms like "lady's bike" or "woman's frame" when I am referring specifically to the bicycle's suitability for females - be it anatomically, or in terms of their ability to accommodate skirts. On the other hand, I use terms such as "step through," "loop frame," "mixte," and "shortened top tube," when I am describing frame geometry. And while some worry that referring to bicycles as "women's bikes" makes them seem inferior or less valuable, I am not on board with that line of thinking. After all, what is considered "standard" frame geometry in the industry, is in fact optimised for the male anatomy. We are female, we are wonderful, and we need bicycles designed for us. To me, that is neither offensive nor obsolete - it's just common sense.
Thursday, January 27, 2011
Stop, Look Around...
All the walking I've been doing lately on account of the weather has made me pay even closer attention to my surroundings than I do while cycling. Everything looks different in the snow - elegant and magical. The thin patch of woods near my house has turned into a majestic white forest worthy of a 19th century Scandinavian painting. It's as if the sky was squeezed straight out of a tube of cerulean blue and the austere vertical strokes of the trees were applied with a pallet knife. It's not my style, but I am certain this scene has been painted many times. It's archetypal.
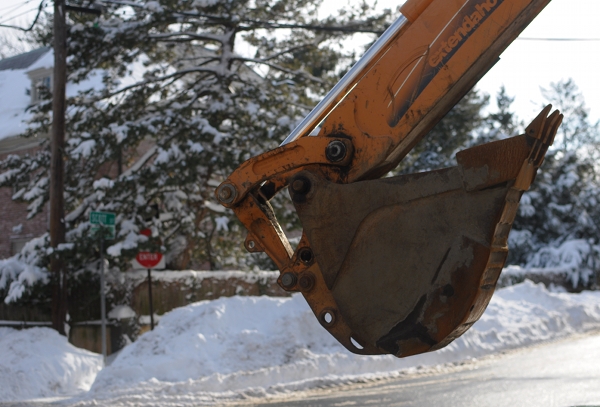
Upon emerging from the pristine wonderland, I came face to face with this. Literally: It was located at face level, and in my willingness to submerge myself so fully in my daydream, I nearly walked into it.
The city is using excavators to facilitate snow removal, as the plows alone are not enough. The effect is interesting, making the neighbourhood look like an igloo construction zone. In order to clear the center of the roads, the excavator dumps more and more snow to the sides - creating monstrous, densely packed snowbanks that line the streets like the walls of some arctic city-state.
Walking on the sidewalk is a surreal experience. You are essentially in a tunnel - with buildings on one side, igloo wall on the other. Along some stretches, the snowbanks are taller than the average human height, so as a pedestrian I can only see the sidewalk in front of me and not the road to the side of me.
Those "Do Not Enter" and "Except Bicycles" signs are for a one-way side street that has a bike lane going in the direction against traffic. For most of last winter the lane looked like this. How cute that I complained about it then: This year it's been swallowed up by the snow banks entirely.
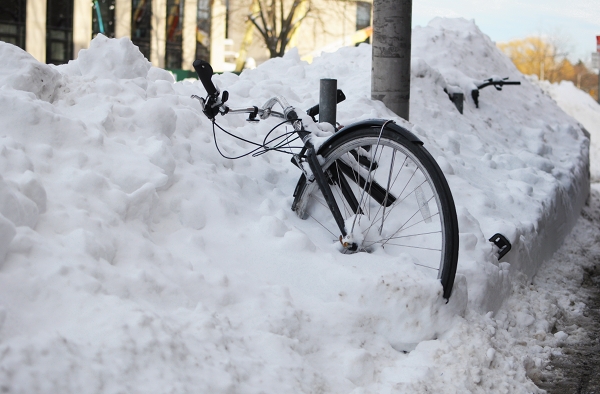
It is not uncommon to encounter bicycles "buried alive." There were actually three separate bicycles inside this snowbank.
Less common is the sight of a bicycle being ridden - but it happens, especially on the heavily salted main roads. Note how the yellow crosswalk sign, its reflection in the puddle, and the golden light of the setting sun play off the colours in the cyclist's knitted hat - all of it especially noticeable against the white, snowy backdrop. Somehow, everything seems to be reminding me of a painting these days. Certainly this person and his hat deserve to be painted.
It's been over a month and a half now without the car. We signed up for zipcar through the Co-Habitant's work, but have not used it yet. And ironically, the blizzards are making it easier to do without: With the roads as bad as they are, we wouldn't have been traveling to any photoshoots up North anyway, and so we don't feel as if not having our car is keeping us from accomplishing anything. We'll get the car fixed as it gets closer to Spring. But for now, it's been remarkably easy to just forget about that thing and for us both to get around entirely on foot and bike. And with so many snow days, I am rediscovering walking - which I appreciate for making me stop, look around, and see my neighborhood in a new light.
Upon emerging from the pristine wonderland, I came face to face with this. Literally: It was located at face level, and in my willingness to submerge myself so fully in my daydream, I nearly walked into it.
The city is using excavators to facilitate snow removal, as the plows alone are not enough. The effect is interesting, making the neighbourhood look like an igloo construction zone. In order to clear the center of the roads, the excavator dumps more and more snow to the sides - creating monstrous, densely packed snowbanks that line the streets like the walls of some arctic city-state.
Walking on the sidewalk is a surreal experience. You are essentially in a tunnel - with buildings on one side, igloo wall on the other. Along some stretches, the snowbanks are taller than the average human height, so as a pedestrian I can only see the sidewalk in front of me and not the road to the side of me.
Those "Do Not Enter" and "Except Bicycles" signs are for a one-way side street that has a bike lane going in the direction against traffic. For most of last winter the lane looked like this. How cute that I complained about it then: This year it's been swallowed up by the snow banks entirely.
It is not uncommon to encounter bicycles "buried alive." There were actually three separate bicycles inside this snowbank.
Less common is the sight of a bicycle being ridden - but it happens, especially on the heavily salted main roads. Note how the yellow crosswalk sign, its reflection in the puddle, and the golden light of the setting sun play off the colours in the cyclist's knitted hat - all of it especially noticeable against the white, snowy backdrop. Somehow, everything seems to be reminding me of a painting these days. Certainly this person and his hat deserve to be painted.
It's been over a month and a half now without the car. We signed up for zipcar through the Co-Habitant's work, but have not used it yet. And ironically, the blizzards are making it easier to do without: With the roads as bad as they are, we wouldn't have been traveling to any photoshoots up North anyway, and so we don't feel as if not having our car is keeping us from accomplishing anything. We'll get the car fixed as it gets closer to Spring. But for now, it's been remarkably easy to just forget about that thing and for us both to get around entirely on foot and bike. And with so many snow days, I am rediscovering walking - which I appreciate for making me stop, look around, and see my neighborhood in a new light.
Tuesday, January 25, 2011
Regular Wool vs 'Technical' Wool
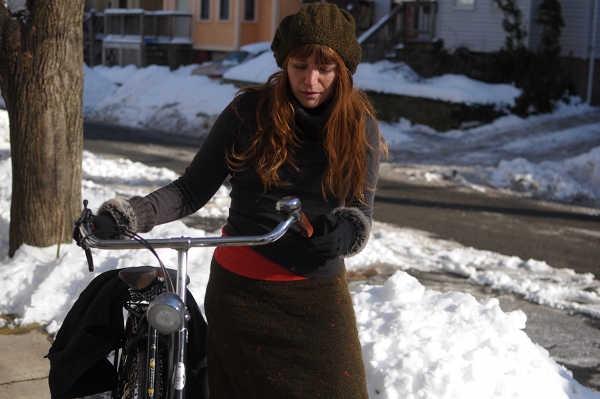
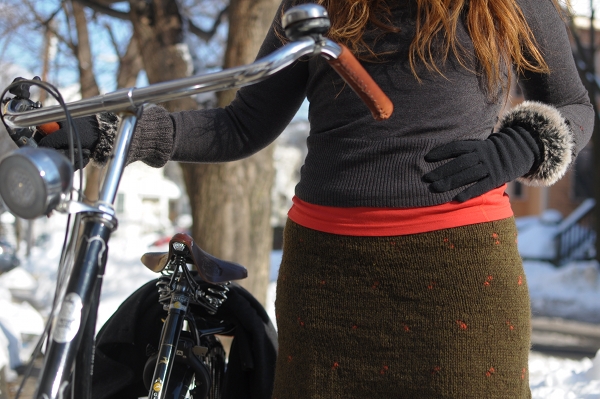
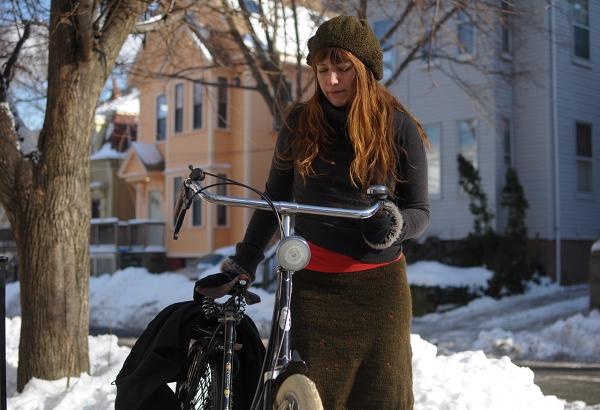
Despite this winter being colder than last, I am finding cycling in freezing temperatures easier this time around. The reason, is that I have finally surrendered to wool. Clad in head to toe wool, I no longer complain about the cold and life has gotten easier. Pictured here: a long sleeve wool t-shirt from Icebreaker (the red bit sticking out), wool sweater and gloves from Jigsaw, wool skirt and hat that I knitted myself, and wool coat (folded over the back of the bike) from Benetton. Not visible here are Icebreaker leggings, Smartwool socks, and I/O Bio underwear and bra - also all wool.
I've certainly worn wool in the past, and - like Dottie from Let's Go Ride a Bike - I have always loved sweaters with enormous turtle/cowl necks that can be unfolded over my face to protect against the frost. But before this year, I have limited wool clothing to outer layers, and did not think I was tolerant of wool right next to my skin. That was why I repeatedly ignored advice that was given me last year to buy lightweight "technical" wool. I remember trying to wear wool shirts and tights next to my skin before, and finding them irritatingly itchy. Today's manufacturers of technical wool - the most popular being Smartwool, Ibex and Icebreaker - promise featherweight, itch-free garments. But they are also super expensive. It took me a long time to suspend my disbelief and commit to giving these things a try, and it also took me a long time to find everything I wanted on sale. But now that I have, I can never go back. The stuff works, and it really is non-itchy - even for someone whose skin is normally sensitive to wool.
I am not sure how exactly "technical wool" is made, and most likely every manufacturer's version is different. But the idea is, that the merino fibers are kept super fine, but made to interlock in a way that results in efficient temperature regulation. In comparison, if you examine a "regular wool" garment - like the sweater I am wearing here - you will find that it is more porous, not quite as smoothly textured, and thicker. Even the finest merino and cashmere sweaters do not have the same tissue-weight quality and smooth, dense texture as the technical wool garments.
All this makes it possible to wear "technical wool" next to one's skin, and for those struggling with the cold, I would highly recommend it. Wearing a wool sweater and overcoat did nothing for me last year, when the stuff I'd wear underneath was made of cotton or some other fabric. My underlayers would get soaked with sweat, and then the wind would chill me to the bone when I would stop at intersections. The feeling of my skin being covered with frozen sweat underneath three layers of clothing was just awful. But wearing wool underwear, bra, tights, and long-sleeve tee, has solved this problem for me completely. As far as the difference between the popular brands, I think they are all pretty good and I just get whatever is on sale. For ultra-thin layers, I prefer Icebreaker. And I also love Icebreaker leggings - they are gusseted, whereas Smartwool leggings are not.
For layers that are not directly next to the skin, I find "regular" wool sufficient - either store bought wool clothing, or things I knit myself. While Smartwool, Ibex, Icebreaker and others do offer technical outer layers, I think it is just too expensive for most people to amass an entire wardrobe out of that stuff. And, of course, it is also stylistically limiting. For me, as long as the layers next to my skin are the technical garments, I can wear pretty much anything over them and it will feel fine. I like to knit my own hats and skirts, because making them is fairly easy and I can invent my own styles. But sweaters are complicated, so mine are all store-bought.
One thing to keep in mind, is that thin merino sweaters are usually warmer than chunky sweaters, because the tightly-knit merino is less porous. Unfortunately, I have noticed lately that even stores that used to sell simple wool sweaters no longer do: I could not find a single sweater at our local Gap, Old Navy, or Banana Republic stores that was 100% wool over the past couple of seasons - and I checked at various points in time out of curiosity. Several years ago, you could walk in and buy a wool sweater without a problem, so I wonder what accounts for this change. Has the price of wool risen? J. Crew still offers a good variety of merino sweaters, as well as cashmere, but I wonder whether that is on its way out as well. It would be a shame, since it seems that an increasing number of people are re-discovering the benefits of natural fibers over synthetics - particularly in the winter. What are your experiences with "regular" wool, "technical" wool, and other fibers?
Tuesday, January 4, 2011
Winter Starts without the Car
Sometime in December, the car which I don't myself drive but share with the Co-Habitant, announced to us that it needs some work. It's not a big problem, but it's quirky. Unable to agree on how to go about getting it resolved, our solution was to put off the decision until we have more time and can think clearly. In the meanwhile, we have been automobile-free for about two weeks - just in time for the snow!
As far as everyday necessities go, we have felt no adverse effects so far from the lack of car. The Co-Habitant typically cycles to work anyhow, and I always cycle to my meetings and errands. We can (though normally don't always) go grocery shopping by bike. And other crucial destinations - post office, bank, hardware store, art supply store, etc. - are within manageable distance as well. When the streets were un-cyclable during the blizzard, we worked from home and walked to the grocery store. If anything, not having a car feels liberating in this respect.
The problematic aspects surface when it comes to long-distance trips. For instance, our photo studio is 14 miles away. It is accessible via the subway system, but the T stop is a considerable walk from our house. That is okay, except that sometimes we transport huge and fragile objects to and from the studio - and that cannot really be done properly other than in our car. We also travel to remote places for photoshoots - and those trips will be suspended until the car is available again. There are other things, like not being able to go to specific supply stores that are in bicycle-unfriendly locations, as well as trips that involve large and heavy cargo. So far we have dealt with these things by either finding alternative (but not ideal) solutions, or postponing them. And while for two weeks that's fine, I wonder how we will feel about it after several more weeks pass.
At the heart of my transportation preferences is a need to feel independent, and most of the time cycling fulfills this need for me better than other options. But sometimes the car is the appropriate tool for the job, and I have nothing but respect for the automobile in that context. I am hoping this carless period will clarify for us, what it is that we actually need from the car given our current lifestyle.
As far as everyday necessities go, we have felt no adverse effects so far from the lack of car. The Co-Habitant typically cycles to work anyhow, and I always cycle to my meetings and errands. We can (though normally don't always) go grocery shopping by bike. And other crucial destinations - post office, bank, hardware store, art supply store, etc. - are within manageable distance as well. When the streets were un-cyclable during the blizzard, we worked from home and walked to the grocery store. If anything, not having a car feels liberating in this respect.
The problematic aspects surface when it comes to long-distance trips. For instance, our photo studio is 14 miles away. It is accessible via the subway system, but the T stop is a considerable walk from our house. That is okay, except that sometimes we transport huge and fragile objects to and from the studio - and that cannot really be done properly other than in our car. We also travel to remote places for photoshoots - and those trips will be suspended until the car is available again. There are other things, like not being able to go to specific supply stores that are in bicycle-unfriendly locations, as well as trips that involve large and heavy cargo. So far we have dealt with these things by either finding alternative (but not ideal) solutions, or postponing them. And while for two weeks that's fine, I wonder how we will feel about it after several more weeks pass.
At the heart of my transportation preferences is a need to feel independent, and most of the time cycling fulfills this need for me better than other options. But sometimes the car is the appropriate tool for the job, and I have nothing but respect for the automobile in that context. I am hoping this carless period will clarify for us, what it is that we actually need from the car given our current lifestyle.
Monday, January 3, 2011
Woven Dress Guards for Drilled Fenders
I love the look and feel of woven dress guards. To me they seem more graceful than the solid vinyl type - allowing for the wheel's spokes to remain visible, while still protecting clothing from flying into them. They can also give a bicycle more "personality," as there are many patterns and different installation methods to choose from. A year ago, it was almost impossible to obtain dress guards like these without making them yourself. However, now there are several options available and I have done my best to get my hands on them.
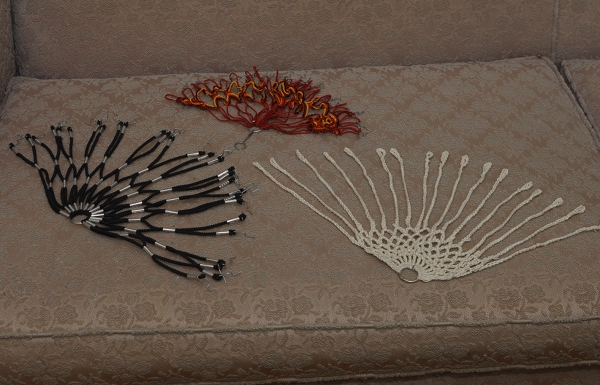
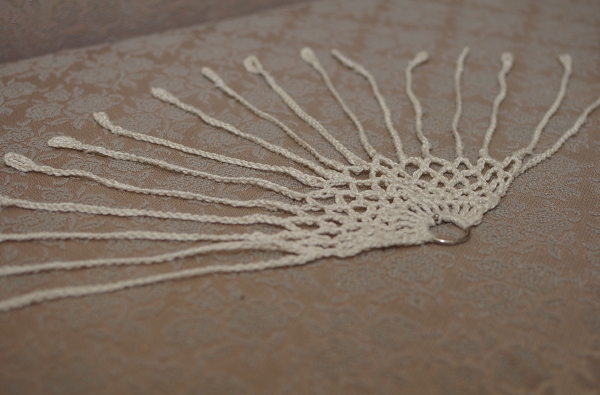
Some of the most beautiful woven dress guards available today are these handmade ones by Bobbin & Sprocket. They can be crocheted in different patterns, according to your specifications (you can see them here on Bobbin & Sprocket's own bike and here on an ANT bike). I ordered a set for my mixte a couple of months ago, but have yet to attach them - because I've decided to do a drilled-fender installation, rather than use the clips provided. The clips don't attach securely enough for my fenders - and I am weary of having the guards fall off and get tangled in my wheel spokes. Earlier, I reviewed the Dutch Simeli dress guards, and clip and fender compatibility was also a problem (they only work on bikes where there is a lot of room between the fender and the tire).
For these reasons, I don't think clipping woven dress guards to fenders is the ideal solution, and suggest the traditional drilled-fender installation instead. I had this done to my vintage Raleigh DL-1 last year, using a simple set of dress guards that a reader had sent me from Portugal. The fancy ones in the picture above were a gift from a friend in Autsria, and are waiting for the right bicycle.
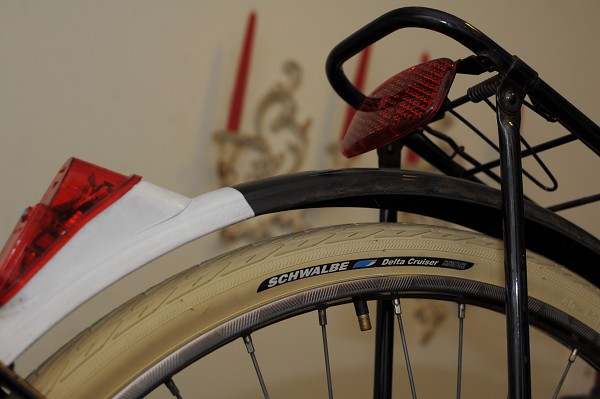
The ones I decided to install on my Gazelle were this set I bought from Mike Flanigan of ANT, who has recently begun to order them from Europe. They are simple, stretchy and durable, and I thought the colour scheme suited my Gazelle nicely. Drilling fenders for dress guards may seem like a daunting task, but the actual act of installing them is not difficult, if you have a good drill. What's difficult is making the commitment: You can't "undo" the holes in your fender once they are there, and nearly every set of dress guards requires a different number of holes.
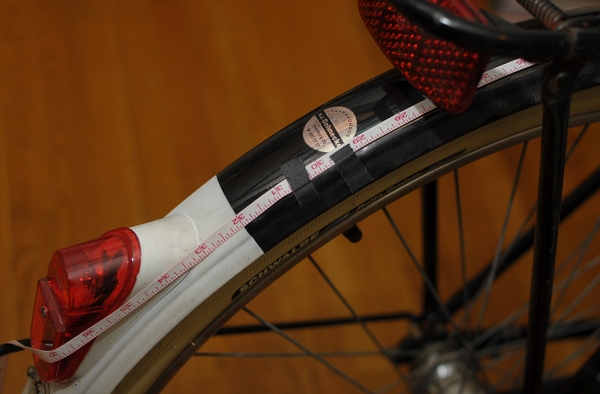
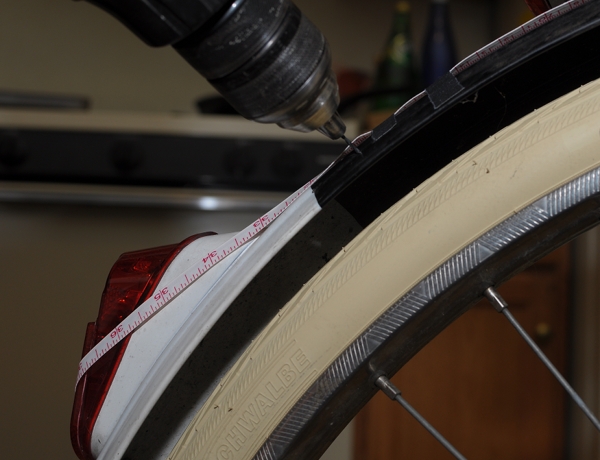
The first step is to consider what part of the wheel you want the dress guards to cover. There is no right or wrong in this regard: If you look at vintage dress guard installations, they are all over the place. Some prefer to cover 1/4 of the wheel, others prefer to cover the entire top half, and others still prefer something in between. Once you choose the coverage area, mark its beginning and end with masking tape. Then, evenly attach a tape measurer along this area. This will allow you to easily mark where the holes are supposed to be. The dress guards I used required 28 holes, which ended up being 1" apart.
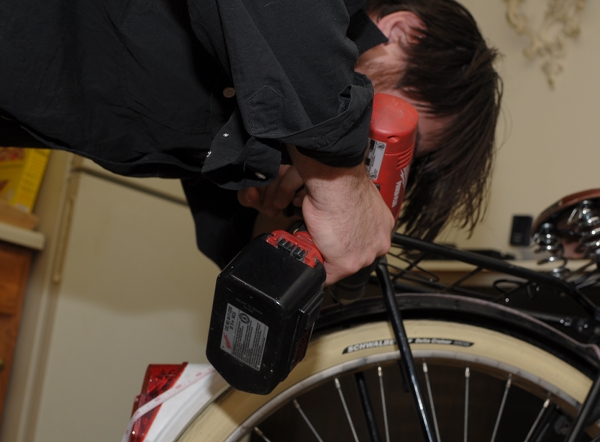
Depending on what bike you have, you do not necessarily need to remove the rear wheel or even deflate the tire when drilling the holes. On Dutch bikes and English Roadsters, there tends to be so much room between the tire and fender, that if you insert the drill bit as far inside the drill as it will go, it will be too short to reach the tire after piercing the fender.
The hooks that come with dress guards are about as thick as medium-sized paperclips, so 1-1.5mm is a good size for the holes. We used a 1mm drill bit.
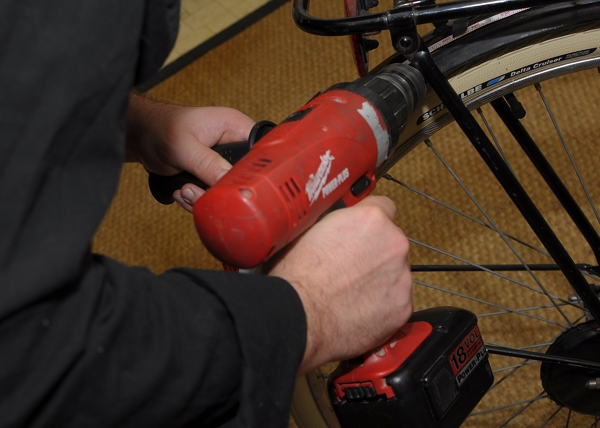
It is good to have a drill with a side handle attachment, as this allows you to keep your hands steady and to have more precise control over the drilling.
And here we go!
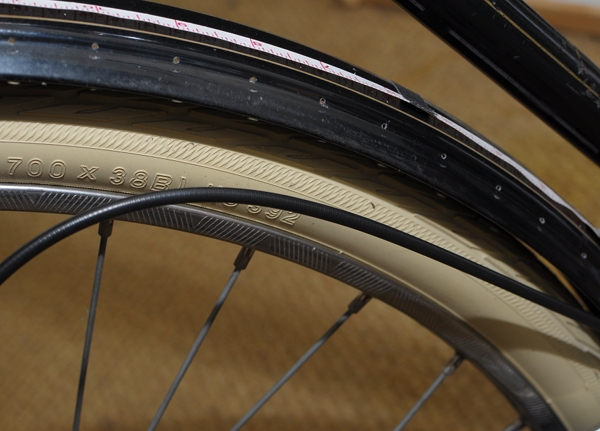
If you measured correctly, the holes should look fairly even - but if not, don't panic. These things are meant to have a hand-made look to them and are forgiving of small mistakes.
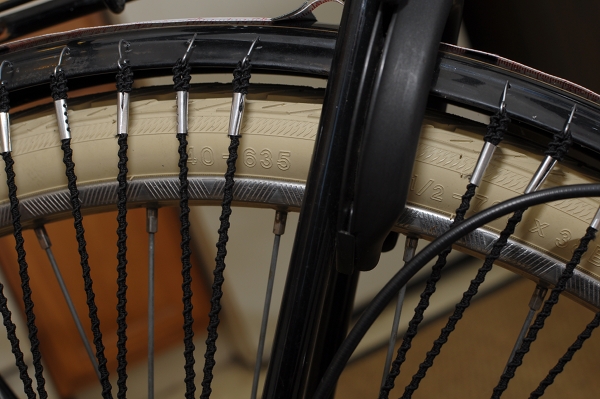
Inserting the hooks into the holes is fairly straightforward. One additional step to consider, is leaving room for the "cafe lock" if your bicycle has one. This should be done at the time you are measuring for holes in the first place.
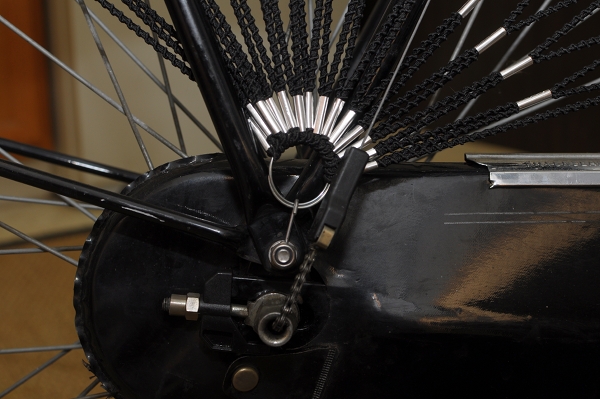
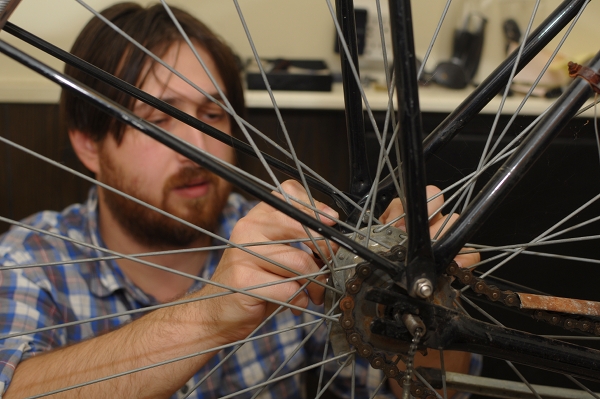
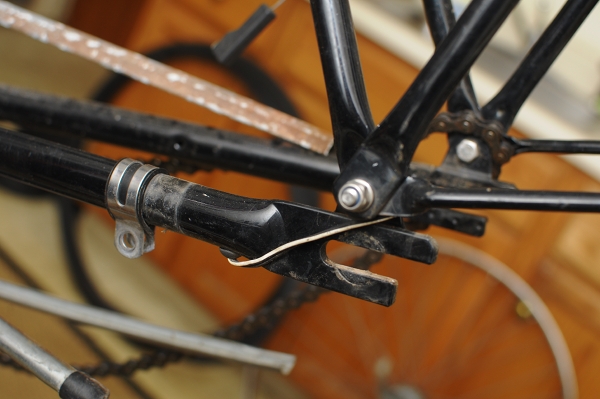
At the drop-outs, the dress guards are typically attached to a bolt using a hook that is provided with the guards. (You will have to remove the nut, then insert the hook, then retighten the nut.) You may have to play around with how you angle that ring to which the cords are attached: The rack stays, the shifter cable and the hub indicator chain may interfere with it, and then you sort of have to angle the ring and insert it over/under, as applicable. Every bicycle is different in this regard, so it is impossible to give precise instructions here.
The important thing, is that in the end nothing sticks out in a way that can catch on your clothing. For example, we crimped the hook on which the ring rests, downward.
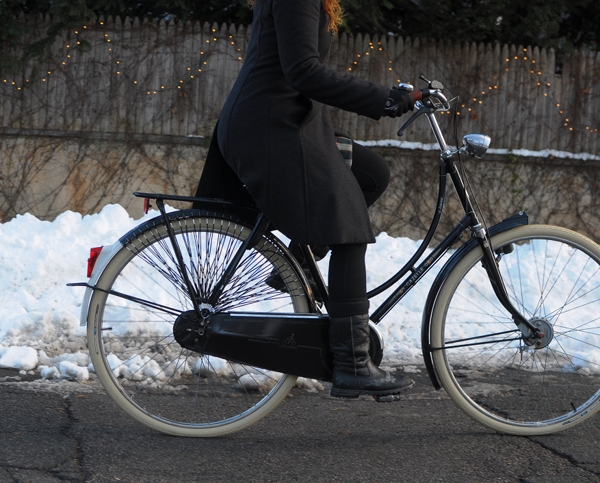
And that is pretty much it. Describing the process step by step in itself makes it seem complicated, but it only took us an hour - which I think is good, considering that it was our first time and we were afraid of messing up. You can see the finished installation in an outdoor setting in this post. Looking at the final result, one could say that these guards could look better if they were fanned out over a wider area - but I wanted the coverage to be denser. It's really a personal choice, and I am pretty happy with how mine have turned out. If you own a drill, this method of dress guard installation is worth considering.
Some of the most beautiful woven dress guards available today are these handmade ones by Bobbin & Sprocket. They can be crocheted in different patterns, according to your specifications (you can see them here on Bobbin & Sprocket's own bike and here on an ANT bike). I ordered a set for my mixte a couple of months ago, but have yet to attach them - because I've decided to do a drilled-fender installation, rather than use the clips provided. The clips don't attach securely enough for my fenders - and I am weary of having the guards fall off and get tangled in my wheel spokes. Earlier, I reviewed the Dutch Simeli dress guards, and clip and fender compatibility was also a problem (they only work on bikes where there is a lot of room between the fender and the tire).
For these reasons, I don't think clipping woven dress guards to fenders is the ideal solution, and suggest the traditional drilled-fender installation instead. I had this done to my vintage Raleigh DL-1 last year, using a simple set of dress guards that a reader had sent me from Portugal. The fancy ones in the picture above were a gift from a friend in Autsria, and are waiting for the right bicycle.
The ones I decided to install on my Gazelle were this set I bought from Mike Flanigan of ANT, who has recently begun to order them from Europe. They are simple, stretchy and durable, and I thought the colour scheme suited my Gazelle nicely. Drilling fenders for dress guards may seem like a daunting task, but the actual act of installing them is not difficult, if you have a good drill. What's difficult is making the commitment: You can't "undo" the holes in your fender once they are there, and nearly every set of dress guards requires a different number of holes.
The first step is to consider what part of the wheel you want the dress guards to cover. There is no right or wrong in this regard: If you look at vintage dress guard installations, they are all over the place. Some prefer to cover 1/4 of the wheel, others prefer to cover the entire top half, and others still prefer something in between. Once you choose the coverage area, mark its beginning and end with masking tape. Then, evenly attach a tape measurer along this area. This will allow you to easily mark where the holes are supposed to be. The dress guards I used required 28 holes, which ended up being 1" apart.
Depending on what bike you have, you do not necessarily need to remove the rear wheel or even deflate the tire when drilling the holes. On Dutch bikes and English Roadsters, there tends to be so much room between the tire and fender, that if you insert the drill bit as far inside the drill as it will go, it will be too short to reach the tire after piercing the fender.
The hooks that come with dress guards are about as thick as medium-sized paperclips, so 1-1.5mm is a good size for the holes. We used a 1mm drill bit.
It is good to have a drill with a side handle attachment, as this allows you to keep your hands steady and to have more precise control over the drilling.
I would also suggest using a fresh drill bit and having a spare one before you start, in case it breaks.
And here we go!
If you measured correctly, the holes should look fairly even - but if not, don't panic. These things are meant to have a hand-made look to them and are forgiving of small mistakes.
Inserting the hooks into the holes is fairly straightforward. One additional step to consider, is leaving room for the "cafe lock" if your bicycle has one. This should be done at the time you are measuring for holes in the first place.
At the drop-outs, the dress guards are typically attached to a bolt using a hook that is provided with the guards. (You will have to remove the nut, then insert the hook, then retighten the nut.) You may have to play around with how you angle that ring to which the cords are attached: The rack stays, the shifter cable and the hub indicator chain may interfere with it, and then you sort of have to angle the ring and insert it over/under, as applicable. Every bicycle is different in this regard, so it is impossible to give precise instructions here.
The important thing, is that in the end nothing sticks out in a way that can catch on your clothing. For example, we crimped the hook on which the ring rests, downward.
And that is pretty much it. Describing the process step by step in itself makes it seem complicated, but it only took us an hour - which I think is good, considering that it was our first time and we were afraid of messing up. You can see the finished installation in an outdoor setting in this post. Looking at the final result, one could say that these guards could look better if they were fanned out over a wider area - but I wanted the coverage to be denser. It's really a personal choice, and I am pretty happy with how mine have turned out. If you own a drill, this method of dress guard installation is worth considering.
Wednesday, December 29, 2010
Snow Queen!
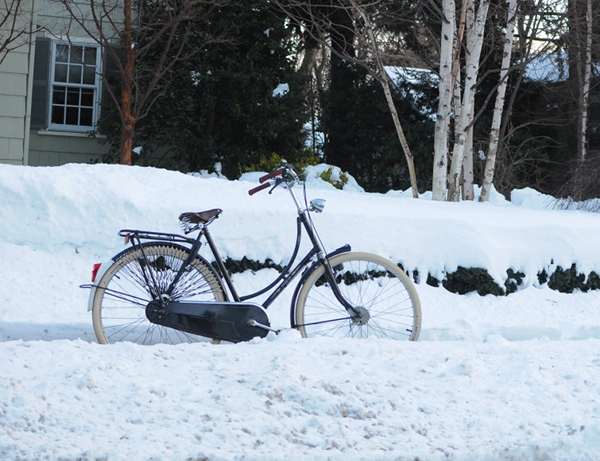
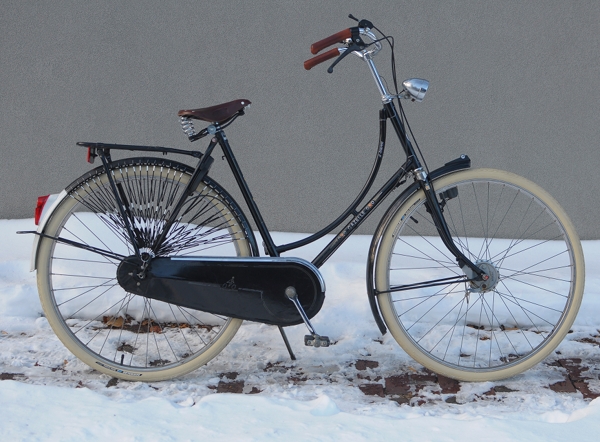
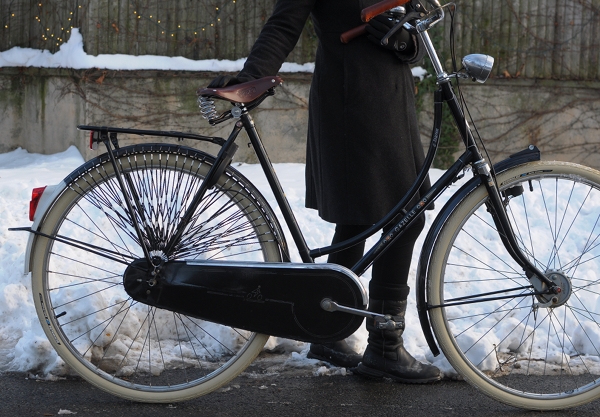
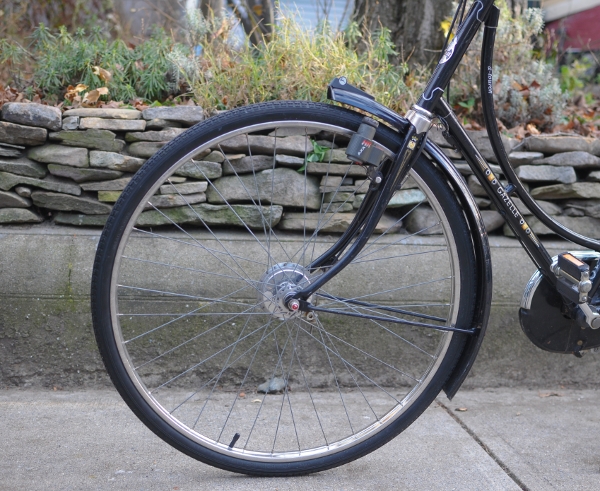
My Gazelle "Linda" has now been updated for the winter, with new tires and woven dress guards. She is a beautiful sight to behold against the snowy landscape!
The tire replacement was something that had to be done anyhow, as the original ones were cracked and I did not want them to fail in the winter. And of course, I was only too happy to replace them with my favourite cream Schwalbe Delta Cruisers. As for the woven dress guards, there was no reason for them what so ever, other than aesthetic caprice. I thought that Linda looked somewhat generic with the solid black vinyl dress guards, and I wanted to personalise her. We purchased the woven dress guards from Mike Flanigan of ANT and installed them by drilling holes directly into the fenders. I have close-up pictures of the installation and will write a detailed tutorial in a separate post, for those interested.
Riding the Gazelle with the new tires, I immediately noticed that she became a bit faster and quicker to accelerate. This echoes my experience with Delta Cruisers on other bikes - which is one reason I love these tires so much. They are the best combination of city/ sporty/ cushy/ all-weather I have found so far. And okay, it does not hurt that they are available in cream!
It was interesting to cycle on the Gazelle after such a heavy snowfall, and to compare her handling to the Bella Ciao - which I rode immediately after the previous snowfall. Somewhat to my surprise, they handle similarly at slow speeds (under 10mph)- which is the speed I stick to under winter road conditions. The Bella Ciao's superior responsiveness and the Gazelle's superior cushiness are considerably less noticeable when cycling gingerly over slush and ice patches. Their common qualities, however, are all the more noticeable: Namely, how well-balanced and stable they both are. The Pashley I rode last year had these same qualities as well - so I think that all three are great winter bicycles.
The Gazelle does have a bit of an edge when cycling over large formations of hardened snow, due to its wider tires. On the other hand, the Bella Ciao has a considerable "winter cyclocross" advantage: It is easier to drag, lift and carry when road conditions necessitate getting off the bike and moving it over heaps of snow or patches of ice. Overall, I am honestly not sure which I prefer, and I see the two bikes as representing different ends of my winter comfort zone spectrum. The Gazelle has a rack and lights, so by default I ride it more. But once I install these on the Bella Ciao, that may change. For those who have tried different upright transportation bicycles in the winter (i.e., Pashley vs Workcycles vs Retrovelo vs Rivendell vs ANT vs Abici, etc.), I would love to know what you think of the handling.
After the first two snow storms of the season, I can already tell that I will have an easier time cycling this winter than I did last year. Nothing has really changed in a drastic way, but maybe my balancing skills have gradually improved and my lungs have grown accustomed to cycling in freezing temperatures. And as far as aesthetics go, I really do think that it helps to have a bicycle that you are excited about as a winter bike, rather than a "beater". This helped me last year and it's helping me now. The winter landscape is so beautiful, that cycling through it on a bicycle I love (and feel safe on) makes it all the more special.
The tire replacement was something that had to be done anyhow, as the original ones were cracked and I did not want them to fail in the winter. And of course, I was only too happy to replace them with my favourite cream Schwalbe Delta Cruisers. As for the woven dress guards, there was no reason for them what so ever, other than aesthetic caprice. I thought that Linda looked somewhat generic with the solid black vinyl dress guards, and I wanted to personalise her. We purchased the woven dress guards from Mike Flanigan of ANT and installed them by drilling holes directly into the fenders. I have close-up pictures of the installation and will write a detailed tutorial in a separate post, for those interested.
Riding the Gazelle with the new tires, I immediately noticed that she became a bit faster and quicker to accelerate. This echoes my experience with Delta Cruisers on other bikes - which is one reason I love these tires so much. They are the best combination of city/ sporty/ cushy/ all-weather I have found so far. And okay, it does not hurt that they are available in cream!
It was interesting to cycle on the Gazelle after such a heavy snowfall, and to compare her handling to the Bella Ciao - which I rode immediately after the previous snowfall. Somewhat to my surprise, they handle similarly at slow speeds (under 10mph)- which is the speed I stick to under winter road conditions. The Bella Ciao's superior responsiveness and the Gazelle's superior cushiness are considerably less noticeable when cycling gingerly over slush and ice patches. Their common qualities, however, are all the more noticeable: Namely, how well-balanced and stable they both are. The Pashley I rode last year had these same qualities as well - so I think that all three are great winter bicycles.
The Gazelle does have a bit of an edge when cycling over large formations of hardened snow, due to its wider tires. On the other hand, the Bella Ciao has a considerable "winter cyclocross" advantage: It is easier to drag, lift and carry when road conditions necessitate getting off the bike and moving it over heaps of snow or patches of ice. Overall, I am honestly not sure which I prefer, and I see the two bikes as representing different ends of my winter comfort zone spectrum. The Gazelle has a rack and lights, so by default I ride it more. But once I install these on the Bella Ciao, that may change. For those who have tried different upright transportation bicycles in the winter (i.e., Pashley vs Workcycles vs Retrovelo vs Rivendell vs ANT vs Abici, etc.), I would love to know what you think of the handling.
After the first two snow storms of the season, I can already tell that I will have an easier time cycling this winter than I did last year. Nothing has really changed in a drastic way, but maybe my balancing skills have gradually improved and my lungs have grown accustomed to cycling in freezing temperatures. And as far as aesthetics go, I really do think that it helps to have a bicycle that you are excited about as a winter bike, rather than a "beater". This helped me last year and it's helping me now. The winter landscape is so beautiful, that cycling through it on a bicycle I love (and feel safe on) makes it all the more special.
Monday, December 27, 2010
15 Years Under the Chaincase
With a blizzard raging outside, what better way to spend an evening than working on bikes? The Co-Habitant agreed to help with my Gazelle (and by "help" I mean "do most of the work"), in exchange for which I prepared lavish portions of a dish that is sort of a cross between French Toast and a Croque Monsieur - only larger, fluffier, more generous on the cheese, and with some secret herbs that make it special. He likes my cooking, I like his mechanics: win-win!
Though I bought new tires for my Gazelle months ago, we had been procrastinating with their installation, as it required dealing with the formidable chaincase. Removing it seemed complicated. And who knew what was under there after all these years?
The Gazelle's chaincase is a vinyl casing that is stretched over a metal support structure. It is clipped and fastened at several attachment points - including an amazing system of clasps along the bottom, the likes of which we have never seen before. I am not certain how closely the current-production Gazelle chaincase resembles the one on my 15-year-old A-Touren model, but mine was not exactly easy to remove and install - not a project for beginners at least.
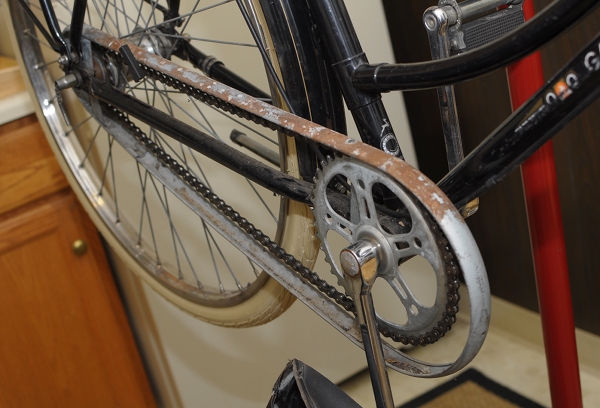
Once removed, this is what was inside. It's entirely possible that the drivetrain has not been worked on since the bicycle was first purchased by the original owner. The metal structure supporting the vinyl casing was covered in surface rust, as were parts of the chain itself. But otherwise, there were no apparent problems. These bicycles were built to be used and abused for years without any need for maintenance.
We were disappointed to see that the chainring did not have little gazelles carved into it like the older ones did. But I suppose that would be too much to expect from a '90s model. The metal chaincase support structure disassembles into several parts - allowing the rear portion to be removed without taking the whole thing apart.
The main chaincase attachment bolt is on the chainstay - a more secure method than attaching chaincases or chainguards to the bottom bracket. Another point of attachment rests on the rear axle. While more difficult to tinker with, the benefit of the vinyl chaincase design, is that it is less likely to rub or knock against the chain. It also weighs less than plastic or metal chaincases - though somehow I doubt that was a concern for the makers of Gazelle.
The Co-Habitant was thoroughly impressed by the design of the Gazelle A-Touren's rear triangle, and believes it to be a better (more integrated) system than that of the vintage Raleigh DL-1 or of the modern Pashley.
Everything on the Gazelle fits together just so, as if the parts were all custom-made for each other. And once the chainguard is off, the fork ends are cut in such a way, so as to facilitate wheel removal. The 28" wheels with the stainless steel rims weigh a ton.
The routing of the tail light is entirely internal: The wiring comes out of the chainstay right next to the fork-end, and snakes along the inside of the rear fender invisibly. These are the kinds of design elements that make this bicycle a fully integrated system - almost an organism - that experiences very few problems. There are fewer things to shake loose, break, or fall out of adjustment, which is what makes it so low maintenance.
I know that some enthusiasts would have next taken the whole bike apart, scrubbed off the rust, polished the frame and components, and put it back together - but we prefer to let functional bikes be. Having checked the drivetrain, none of the components seemed to be any worse for wear despite some cosmetic degradation, so we just cleaned them up a bit, greased everything, adjusted the brakes and shifter, and closed the whole thing back up. I will replace the chain soon just in case, but that is about it. Changing the tires on this bike was easy, and the cracked originals are now replaced with new Schwalbe Delta Cruisers. We also removed the vinyl dressguards and are replacing them with something more personalised. The snow continues today, but by the time it is over the winterised Gazelle will hopefully be ready for her test-ride. Working on this bicycle has made us both appreciate just how well it was built. I know that the current-production Gazelles differ in the way they are constructed, but I hope that they retained at least some of the ingenuity of the original design.
Tuesday, December 7, 2010
'Fork's Bent?'... Suspicious Cracks in the Paint Cause Concern
The phrase "fork's bent" has become a private joke of sorts in vintage bicycle circles. Almost any time somebody posts a picture of their "awesome vintage find," there will be that one person who comments that "the fork looks bent." Most of the time, the fork is not bent and it's just something to say - or maybe the angle or the lighting in the picture are misleading. Nonetheless, the possibility of a bent fork or frame is certainly something to watch for in vintage bikes. If a bicycle is steel, a bent frame or fork is not necessarily tragic - steel is flexible and the bent portion can usually be straightened. Cracks, on the other hand, are of greater concern.
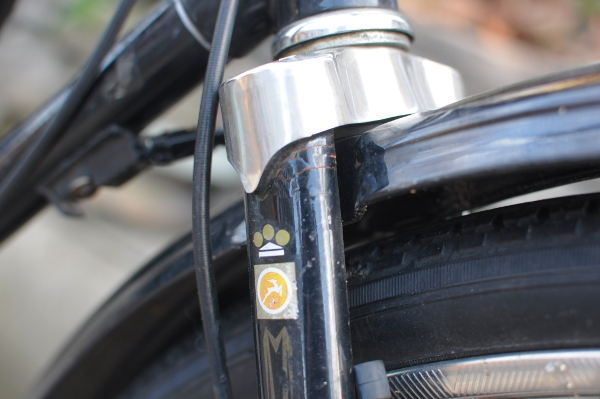
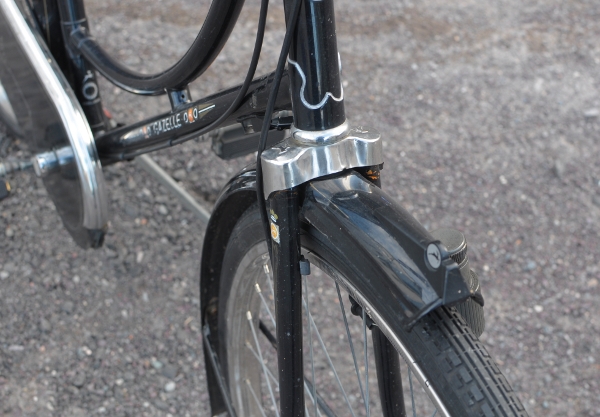
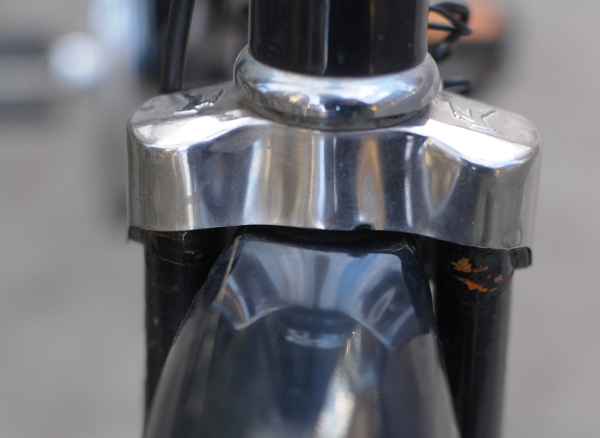
During my visit to Geeekhouse last week, the guys were looking at my Gazelle and pointed out that the bits of cracked paint underneath the fork crown could indicate cracks in the surface of the fork itself. Needless to say, my heart sank.
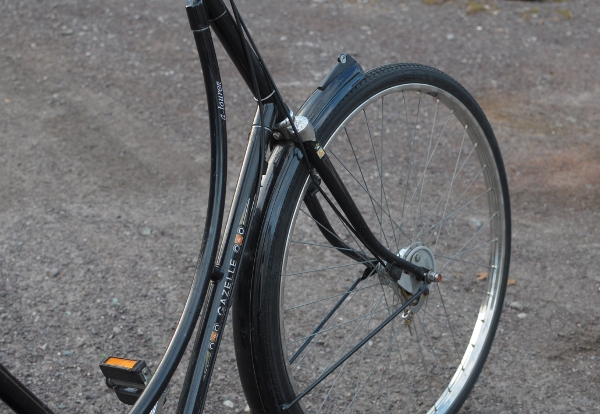
I noticed the cracked paint before, but didn't think anything of it. The fork blades in of themselves are not deformed and there are no indicators that the front end of the bike has been in a collision. In an impact strong enough to bend the fork, surely there would have been some other damage - but there is not a scratch anywhere. The bicycle also handles absolutely fine - better than fine - with no indication of anything "off" in the steering.
It would be easy to dismiss the cracked paint, if it were not for one red flag: The cracks are symmetrical - right underneath the fork crown, on both the right and the left blade. How did they get there, and how can we tell whether it really is just cracked paint or an indicator of some sort of trauma to the fork?
I was speaking to a local frame-builder yesterday, who advised to check for similar paint cracks in the back of the fork blades. There are none; the paint is cracked only in the front. To him, this was an indicator that the fork could be fine - as stress fractures typically happen in the back and not in the front of the blades. He also pointed out that even if the fork has been bent and reset, or even if there are hairline cracks, a massive Dutch fork like this can probably take it, without it being a safety issue. No doubt there are loads of people in the Netherlands riding ancient beaters with visibly bent forks.
But the bottom line is, that we simply don't know what's going on under that cracked paint. To find out for sure, I would need to remove the paint from the fork blades and thoroughly examine the steel underneath - which I am reluctant to do, as the original paint is so nice. Is there any way to diagnose while keeping the paint intact? Any suggestions or thoughts are welcome.
During my visit to Geeekhouse last week, the guys were looking at my Gazelle and pointed out that the bits of cracked paint underneath the fork crown could indicate cracks in the surface of the fork itself. Needless to say, my heart sank.
I noticed the cracked paint before, but didn't think anything of it. The fork blades in of themselves are not deformed and there are no indicators that the front end of the bike has been in a collision. In an impact strong enough to bend the fork, surely there would have been some other damage - but there is not a scratch anywhere. The bicycle also handles absolutely fine - better than fine - with no indication of anything "off" in the steering.
It would be easy to dismiss the cracked paint, if it were not for one red flag: The cracks are symmetrical - right underneath the fork crown, on both the right and the left blade. How did they get there, and how can we tell whether it really is just cracked paint or an indicator of some sort of trauma to the fork?
I was speaking to a local frame-builder yesterday, who advised to check for similar paint cracks in the back of the fork blades. There are none; the paint is cracked only in the front. To him, this was an indicator that the fork could be fine - as stress fractures typically happen in the back and not in the front of the blades. He also pointed out that even if the fork has been bent and reset, or even if there are hairline cracks, a massive Dutch fork like this can probably take it, without it being a safety issue. No doubt there are loads of people in the Netherlands riding ancient beaters with visibly bent forks.
But the bottom line is, that we simply don't know what's going on under that cracked paint. To find out for sure, I would need to remove the paint from the fork blades and thoroughly examine the steel underneath - which I am reluctant to do, as the original paint is so nice. Is there any way to diagnose while keeping the paint intact? Any suggestions or thoughts are welcome.
Subscribe to:
Posts (Atom)